Fire Starting with a Metal Match & Tinder Bundle
A simple method for fire starting is the use of a metal match, commonly referred to as flint and steel. True flint and steel is nothing more than a piece of flint- the rock- and a piece of steel. These will not be discussed here. Artificial flint, or the metal match, is an alloy rod that creates a spark when steel is run along its length. I have attached to all my survival knife sheaths a small, two-dollar Boy Scout “flint” rod. It easily gives a spark and is good for a thousand uses. You may want to opt for a larger “flint” than this one- Light My Fire makes its Swedish FireSteel in three sizes, the largest of which is good for 12,000 sparks and is a couple of inches long by about 3/8 inch in diameter. I recommend carrying one of these with your knife as well- buy one today and tie it on with a piece of 550 cord. It is efficient, very simple to use, and requires less practice than other methods. But you must practice this method as well. Do not expect it to work for you on your first try, and do not make your first try a time when you really need it.
And of course, the easiest methods for starting a fire would be matches or a lighter. I never go anywhere without a small Bic butane lighter in my pocket, especially into the wilderness. Do the same- get into this habit now and if you find yourself needing to build a fire, you will have the lighter in your pocket.
Tinder, Kindling, and Fuel
Any of these fire-starting methods require a tinder bundle for your spark, kindling, and fuel. Spending the time to create the perfect tinder bundle, to collect up the perfect pile of kindling and a sufficient pile of fuel for your fire will mean the difference between using one match or wasting matches.
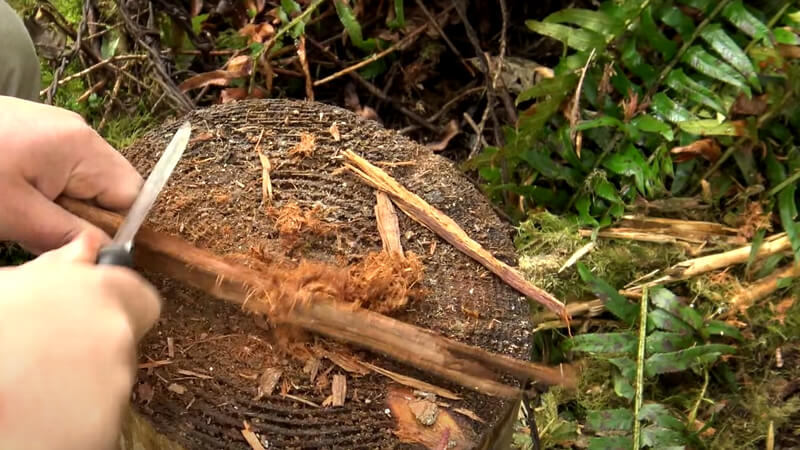
Some of the best materials for fire building are available in nearly every canyon I have ever been in. Bark from the Juniper is the best tinder available. It is easy to find and remove from any Juniper you come across. My second choice is the hairlike, inner material from dry cottonwood bark. Chunks of dry cottonwood bark are usually found at the base of larger cottonwood trees; look for those that have large, dead branches. Either material should be twisted in the hands, or pounded between a couple of rocks to break it up and create the fine powder that is so easy to ignite. Of course, there are countless other materials that can be used for a tinder bundle. The idea is to find something that can be reduced to fibers, and pounded nearly into powder. Other plants to look at include sagebrush, rabbitbrush, and some grasses if they are fine and very dry. After making your tinder bundle, simply direct the spark from your “flint” into the bundle by holding your knife stationary and pulling the flint away (or by holding the flint stationary and pushing the knife blade down the length of the flint rod), transfer the spark that you have created from your bow and drill into the bundle, or flick your Bic as they used to say.
Fire-Making Tip– If you find yourself in a survival situation, or you have put yourself to a primitive living test, collect up enough Juniper bark (or other tinder) for at least a few fires. Keep it tucked away in a plastic bag, or in a jacket pocket where it will stay dry. This is especially important if you are threatened by rain. Juniper bark is much easier to light if it is very dry, especially if you are starting your fire with a metal match and steel. Just a bit of dampness makes it quite a bit harder to light. Keep this in mind when you get set up to start your fire. Make sure that all your materials are laid out on a very dry surface. The spark from a bow and drill is much more forgiving of damp tinder. And of course, your Bic will dry out the dampness, to a degree.
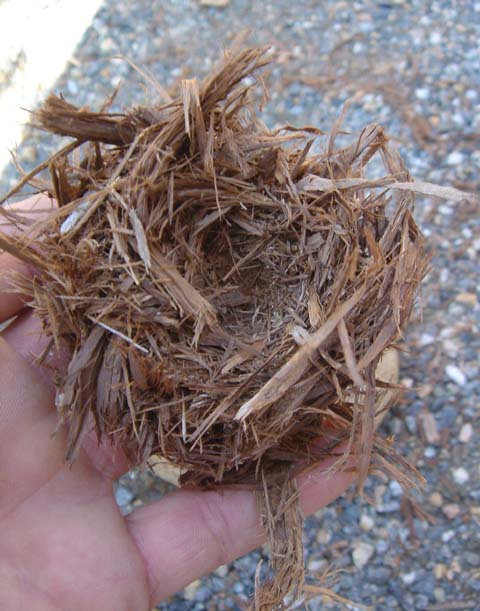
Tinder bundle, or birds nest, of dry juniper bark ready to receive a spark from bow and drill or flint and steel. Alternatively, you could hold a match or lighter underneath for a second or two and it will burst into flame.
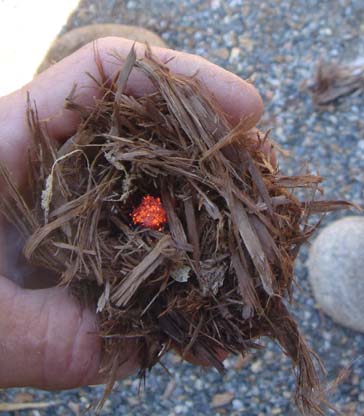
In the photo, a spark made with a bow and drill has been carefully placed in the center of the tinder bundle and is blown into a flame. After your tinder bundle has burst into flame, carefully place your smallest kindling on it, equally distributing it all the way around the fire. Some of the best tinder can be found at the base of sagebrush- collect a couple of handsful of the small, dry, dead branches. The best method for building the fire is to form a teepee with sticks to allow oxygen to flow through. Continue placing larger diameter and longer pieces on the fire as the pieces catch fire, until finally laying on the larger pieces of fuel.
Making Fire – the Metal Match and the Magnesium Fire Starter
In Paul Theroux’s The Mosquito Coast, Father would have us believe that “ice is civilization.” I say that fire is civilization- in survival or primitive situation, if you can create fire, you can control your destiny. With that said, this page will outline basic primitive fire-making techniques. When I say “fire-making”, I do not mean piling rocks in a circle, throwing wood and paper inside, and tossing in a match. Our focus here is creating fire from sticks using friction- the Bow and Drill, and from a metal match or magnesium fire starter and steel. These are the easiest primitive fire-making techniques. There are other methods that we may discuss at a later date, such as the fire plow, the hand drill, the pump drill, the fire saw, and actual flint (a chunk of rock) and steel. For now, we will stick with the basic two methods.
Metal Match and Steel
The “metal match”, often referred to as “flint”, is found in the form of a rod from about one to two inches in length. It is composed of a metal alloy known as ferrocerium. The company Light My Fire makes a popular metal match by the name of Swedish FireSteel. It comes in three sizes: The Mini (giving 1,500 sparks), The Scout (giving 3,000 sparks), and The Army (giving 12,000 sparks). The Mini and the Scout are available at REI- the Firesteel Scout for 15 dollars, and the FireSteel Mini for 8 dollars. I keep one of these “flints” tied to the sheath of each of my survival knives. Each one comes with a piece of steel for striking. Since I keep mine tied to my knife, I usually discard this part of the kit. If you do use your knife blade for striking, use the back of the blade, and at an angle that allows for the least amount of contact from the blade along the striking rod.
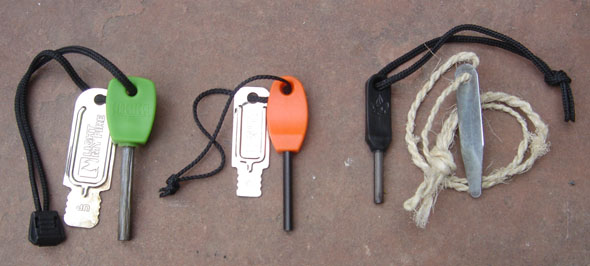
This photo shows the difference in size between the Scout model FireSteel, the Mini Firesteel, and the Boy Scout Hot Spark. The rod on the Scout Firesteel is 1/4 inch in diameter and 1 3/4 inches in length, the Mini firesteel is 3/16 inch in diameter and 1 1/2 inches in length, and the Hot Spark is 3/16 inch in diameter and 1 inch in length. The respective striking steels are also shown. The difference in length is noticeable during use. The longer rod is easier to use.
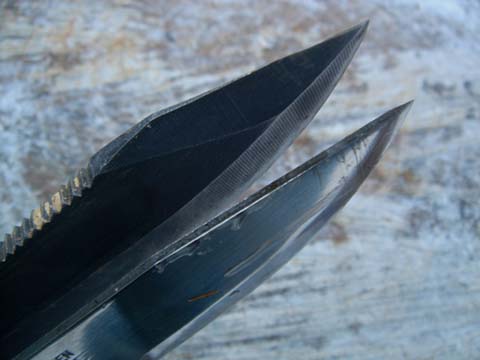
This photo illustrates the difference in the backs of the blades of two survival knives. On the top is the USAF Survival knife, and on the bottom is the Frosts Mora Military Survival knife (read more about these knives on our Knife Review page.) The back of the USAF knife at the tip is perfect for running along the rod. It is very thin, essentially a sharpenable section of the blade. The back of the Mora blade at the tip is the same thickness as the rest of the blade back. It is a bit harder to get the same amount of spark as with the USAF knife, but it still gives sufficient spark to start a fire. I tilt the mora blade so that just the corner of the blade makes contact with the rod. The composition of the blades may also have something to do with the difference in spark, although I am not certain of this. The Mora knife is stainless steel while the steel blade of the USAF knife will rust.
Using the metal match and steel is a relatively easy method for fire starting- with practice. Do not expect to start a fire on your first try, or even your tenth. And do not underestimate the importance of preparing your tinder. The tinder bundle receives the spark from the rod and must be prepared with care. It is best if you have a very dry tinder. Very fine, hairlike tinder that is loosely bundled is the goal here. The spark is directed from the rod as the steel, in my case, the back of my knife blade is steadily run down the flint rod toward the tinder bundle. Alternatively, the knife blade, or steel, can be held stationary while the flint rod is pulled away. The latter method tends to be a little more forgiving to your tinder bundle as there is less chance of disrupting the materials by hitting them with the knife blade. I use both methods, tending towards holding the flint stationary more often. You will need to experiment to find out which method works best for you.
Once the spark has ignited the tinder, blow the tinder bundle into flame and continue on with your preferred fire-building technique.
Magnesium Fire Starting Tool
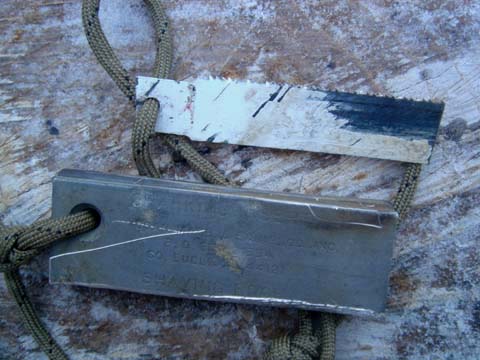
This photo shows the magnesium fire-starting tool, a military issue item. The striking rod is at the top of the block in this photo, near the saw blade, barely visible. It has been well used on this tool. The saw blade in this case is a Sawzall blade snapped off to the length of the magnesium block and tied on with a 550 cord.
The magnesium fire-starting tool is essentially a metal match embedded along one side of a block of magnesium. I keep a broken length of the saw blade, the length of the magnesium block, tied to the block with a piece of 550 cord. I use the teeth of the blade to scrape magnesium shavings from the block. I slide the hacksaw blade down the corner of the magnesium block while pushing the blade across the corner. This seems to create shavings of a proper size for ignition. You can also use the broken end of the hacksaw blade to remove shavings from the block. This is the recommended method by many who use the tool, including Cody Lundin in 98.6 Degrees: The Art of Keeping Your Ass Alive. The shavings should be directed into something to catch them, then carefully placed as a mass in the center of your tinder bundle. The tinder bundle in this case does not need to be as loosely bundled as with the metal match alone- the magnesium shavings will do their job either way. Next, strike the metal match and ignite the mass of magnesium shavings and you have the beginning of your fire. Using magnesium shavings insures that your bundle of tinder will ignite. This method is especially useful if your tinder is damp. The magnesium fire-starting tool is available at REI for about 5 dollars.