This is a complete series of tutorial on how to make a sword. The sword we make is nothing fancy but it is a serviceable sword.
In this tutorial we will be making a plain sword that is not too long and edged on both sides. Just a utilitarian kind of sword and nothing fancy. The objective here is to learn how to actually make one!
If you have never done much blacksmithing you might want to start out a little bit easier. I have a project on how to forge a knife. That is a great place to start because most of the techniques and skills are the same, just on a smaller and easier scale.
And, it does take quite a bit of work to make a sword because the blade is so long. A knife, while also taking time, isn’t nearly as labor intensive.
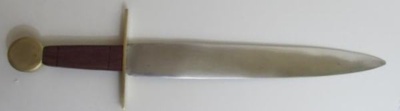
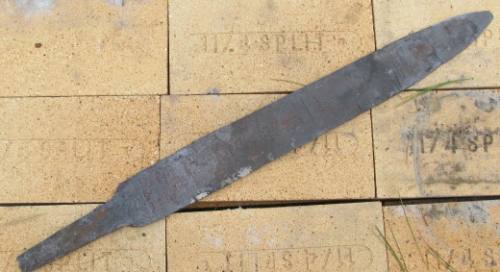
Here is the finished sword that I make in this tutorial. This way you can get a look at what we are working toward.
What steel for your sword?
This can be a bit of a tricky question and there are several different answers. The short explanation is to use whatever steel is available. But if you have a choice I would go with O1 or 5160. They each have their strengths and weaknesses but will suffice to make a good sword. I am assuming you are a beginner or you just dabble in blacksmithing.
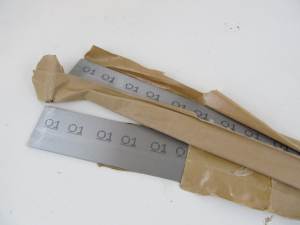
Here are two pieces of O1 steel. The exact one that I use for this tutorial is the one on the bottom. It is eighteen inches long, two inches wide, and three sixteenths of an inch thick.
I ordered it from amazon.com. If you want to order this exact same piece of steel here is the link: Tool Steel O1 (Oil Hardening) Flat Stock, Ground, ASTM-A681-94, 3/16″ Thick, 2″ Width, 18″ Length
Ok, crank up the forge and let’s get started.
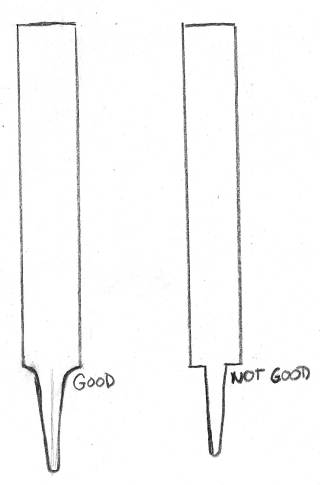
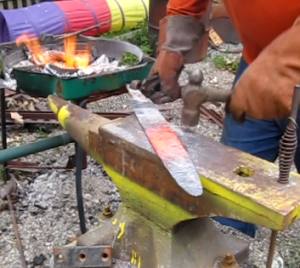
The first thing we are going to do is create the tang (handle) of the sword. The picture at left gives you a good idea of what we are shooting for. Now, in the beginning of the project we don’t want to get the final shape because there is a lot more work to be done. We just want to do the rough blacksmithing and get it close to the final product.
The picture shows one important concept when hammering out the tang. You don’t want to have sharp angles on it. This makes it real easy for stress fractures to form in that angle. And stress fractures can cause the blade to break right off the handle. Yikes! So, get those corners rounded.
The sword on the left shows rounded corners. You don’t have to get them that rounded. The rounded corners are a bit exaggerated in the picture so you can see and understand the concept.
So, how do we form this tang shape?
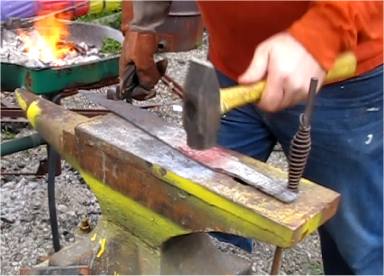
This picture shows the hammering technique to use. This is called Edge hammering. You place the sword on the anvil and strike with the hammer just as shown. This causes both the top and bottom to compress evenly.
Drawing out the Blade of the Sword
Ok, now that the tang is about where we want it is time to start working on the size of the blade.
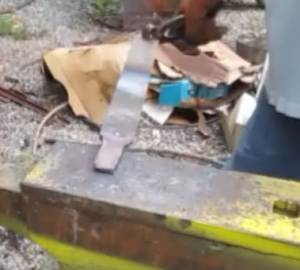
We started out with a piece of steel that was 18 inches long which makes for a pretty short sword and you could even argue that it is only a very long knife!
So we want to make the blade longer. And because it is 3/16 inch thick it is way too thick for a sword which is great. We will take some of that thickness and hammer it into length. We do this with a hammering technique called “drawing out”.
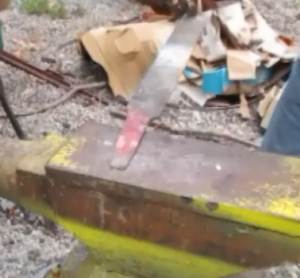
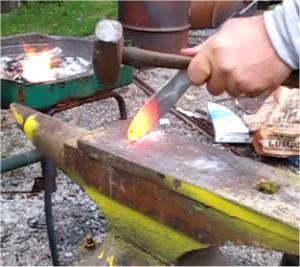
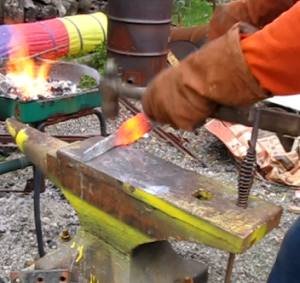
You do this in three or four heats. You can’t heat the whole blade. Just start on one end of the blade and heat it. Can be the end near the tang or the tip end. Just start on one end.
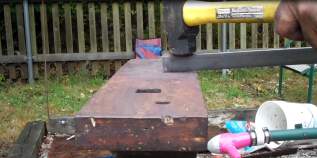
Heat it up then place it on the edge of the anvil as shown in the picture. Hit it strongly with a hammer all the way across the blade. It will take three blows in the case of this sword. Once the three blows are made you then move the sword up about a half inch and hit it three times again. You continue doing this through the whole red hot section of the blade.
What does this do?
It causes the metal to spread only in one direction (length). The sword will spread very little in its width. And this is perfect. It makes the sword longer without making it wider.
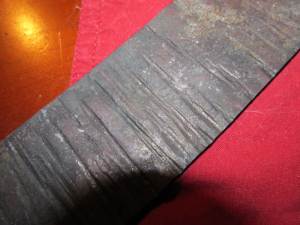
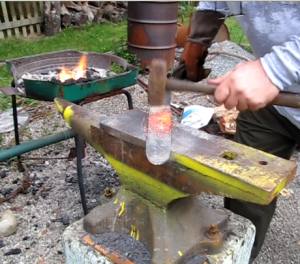
The picture here shows the ridges that are created.
Well, we don’t want them to stay so at some point you will have to hammer them out.
But, a good idea is that while you are working on a section of the blade you draw it out, then you flip it over quick and hammer these ridges down right away. Then you put it back in the forge to heat the next section.
You probably won’t get it perfectly flat but you will do a lot of the smoothing out right at this point. And you are doing it as you progress. This will save you a lot of time and work later.
Ok, creating the tang and drawing out the blade of the sword is a few hours of work! Soon we will continue on to the next part of the tutorial where we shape the blade and the point.
Here is the video that shows this part of the process of sword making
Shaping and forming the blade
This picture shows us what we end up with after this part of the tutorial. It’s starting to look like a sword!
A Note Before Starting –
Now you really need to start focusing on the shape and trueness of the sword. And one way to insure this is to spend a fair amount of time working the sword lengthwise on the anvil like shown in the picture here.
Make sure it stays flat and true. You will have to hammer it down often. But keep this in mind as you are working on the sword.
The Forging Work We do in this lesson
There are a few major things that we want to accomplish in this part of the sword making.
- We want to get the whole sword pretty close to its final form. This will save us a lot of sanding and grinding work later on.
- Get the whole sword so it is flat and straight
- Form out the shapes of the sword including the tang and the point. We had previously worked on the tang and now we get it close to its final shape
- Hammer out the ridges and unevenness of the whole blade
- Hammer out the bevels along both sides of the blade
Let’s start by forming out the point of the sword. At this point don’t get it fully to its final point. You can do that at the very end. This is because you have a lot of work to do on this sword and that point, being repeatedly heated, will be a bit fragile. So get it close to final form but a little beefy for strength. I get it roughly pointed but leave it a bit rounded.
Now let’s work on the blade and get it into shape. The majority of what we are doing here is working out the inconsistencies in thickness and the various lines and marks we have created during the forging process. If you drew out the blade like I did then there are lots of marks that need to be removed.
You work on the blade in heated sections starting from either the hilt or the point. Just do repeated heatings working your way slowly down the whole blade. And then work your way back up if you need to.
Remember, be conscious of it being straight and true and of an even thickness, with, if you can, a slight thickening toward the handle.
IF: If your blade is pretty even and clean already because you didn’t work it much you could go ahead and also hammer in the bevels. This way it saves time and reduces the amount of heating and work done to the sword.
But, for this sword I do most of this work then I move on to working in the bevel of the sword.
Now create the bevel of the blade. In the case of this sword I am beveling both sides.
This might be a good time to switch to a smaller hammer just as I have done.
Just as you did with cleaning up and flattening the blade you work your way up and down the blade, heating it in sections, and hammering in the bevel.
You do this by slightly lifting the far edge of the sword and hammering the bevel into the near end. Flip it around and do the other edge while each section is hot.
Keep an eye on it. At this point you need to work with your eyes close to the sword. Keep it as straight and as flat as possible. And it takes some practice but try to keep the thickness very even. The better you do here the less work you will have to do by hand later.


Ok, our sword is looking great. It is pretty much in its final shape and form. Next we will need to anneal it which softens it up so we can work on it with hand tools.
Annealing the blade
What you need to do in order to soften up and release the stress from the sword is to heat the whole thing up to Curie Temperature. This temperature will vary depending on the type of steel you are using. And it is impossible to know the temperature of the sword without some fancy gadgetry. But, we can easily solve all of that with a magnet. As you heat up the sword and it gets to the correct temperature it will lose all its magnetic attraction- a magnet will no longer stick to it.
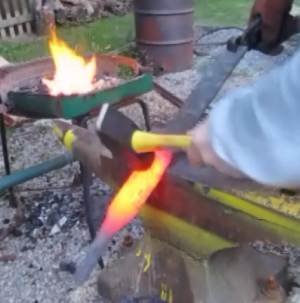
That part is pretty easy. The real challenge is heating up the whole sword evenly and slowly. There are a few different ways to do this and if you are a homemade kind of person you can whip something up. I show you here what I made but you can do something similar. I used something I call “The Sword Forge”.
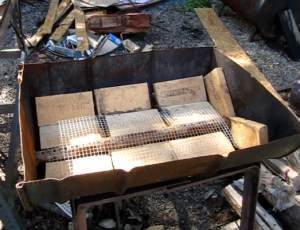
Here is a quick look at the sword forge. It is very similar to a regular forge but the tube running along the length is the tuyere and it has holes in it. This way we get a long bed of coals. The bricks are fire bricks.
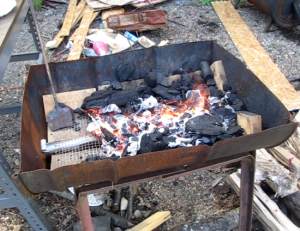
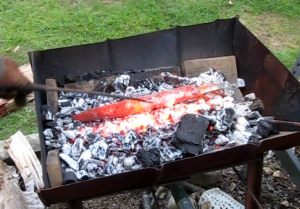
So, put the sword in the forge and heat it up evenly along the whole length. Move it around as often as needed and move the coals around as you need to. The important thing is to get it as evenly heated as possible. When the whole sword is glowing red you can check it with a magnet to see if it doesn’t stick. If the magnet doesn’t stick then it is ready.
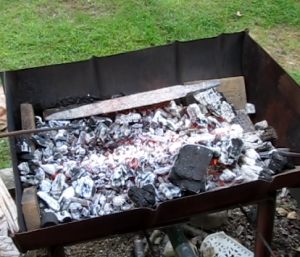
Move the sword over to the side of the forge and turn the forge off. We want the sword to cool slowly. This is why we keep it in the forge and let the forge die out slowly. This will take a couple of hours and you also have the option of taking the sword and burying it in sand or vermiculite. This will also cool it slowly.
And that’s it. The sword has been annealed. It is soften and the stress has been relieved from it. Next we will do the rough grinding and shaping.
Rough Grinding
In this part it actually ends up looking quite a bit like a sword! It is called rough grinding but we do 95% of all the grinding right here. We will do the finish grinding and polishing in a later step.
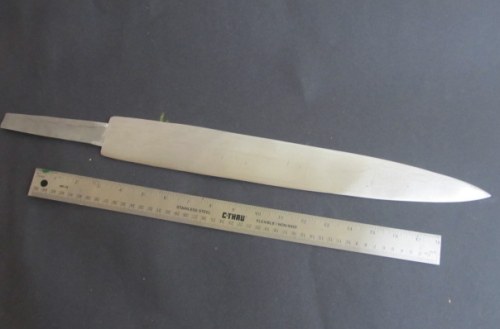
First let’s take a look at what we end up with after this rough grinding portion of the tutorial. The ruler is an 18″ ruler. So this is definitely a short sword. But you can see it is well defined and has a nice shape. And the blade looks pretty good. I have spent some time grinding the blade. But it doesn’t have it’s final polish. We will do that in a later part.
Laddering down the variety of tools
That is a bit of an unusual term “laddering down the tools” but what I mean is that you start with the bigger power tools to do rough work then you move down to the finer tools to do the finer work.
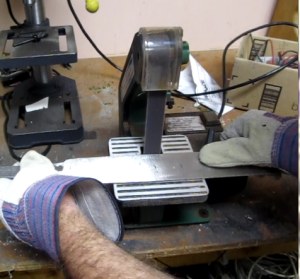
Start with a 6″ belt sander if you have one. This will do most of the work for you. Clean off all the scale and sand down the profile of the sword so it has a nice sword shape!
From there you move on to the smaller tools like the bench grinder, the 1″ belt sander then files and finally 100 grit emory paper.
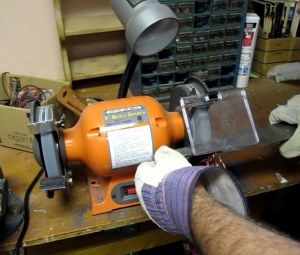
This picture shows me using the bench grinder. One of the best uses of the grinder is to get the spot where the blade ends and the tang begins. I will show you another picture of that.

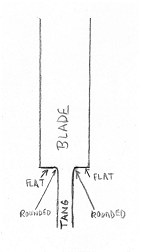
This picture shows a couple of important points when it comes to shaping the tang.You have to have two flats on the blade. The guard will rest against this flat. And the point where these flats meet the tang should not be sharp angles. You should round these inner corners. This will make it stronger and less susceptible to stress cracking.
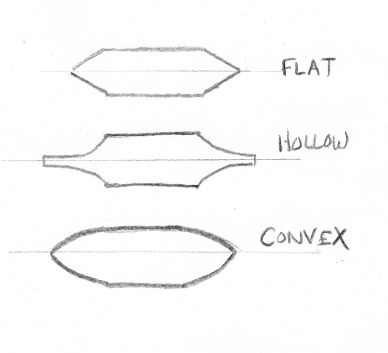
ow we need to take a look at an important part of grinding the sword. This picture shows three different ways you can grind it. These are sideways views so you can see the edges of the sword. You have to grind along the full length of each side of the blade.
The first type of grind is a flat grind. The ground edges of the bevels are straight. The second type of grind is a hollow grind. This gives the sharpest blade but it is the hardest grind to do. The third one is a convex grind and this is the type that I have done on this sword.
Okay, so this part is a lot of work. I spent 4 hours on the belt sander alone. Take your time and you only have to go down to 100 grit emory paper. We don’t want to polish this sword because it will be going back into the forge.
Make the Handle
In this part of the tutorial I show you the three major parts of the handle of a sword and I show you how to make and install them. And there are a lot of different kinds of handles you can make. I show you a plain wood handle and a wire wrapped handle. From here you can improvise all kinds of different handles to make anything that you like.
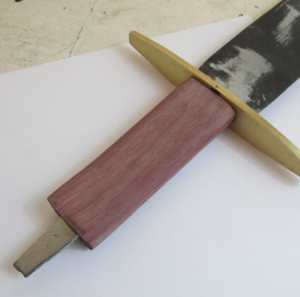
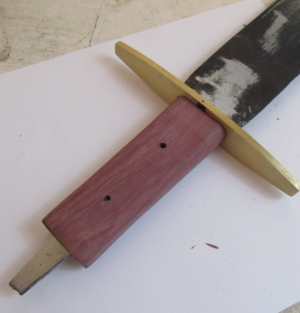
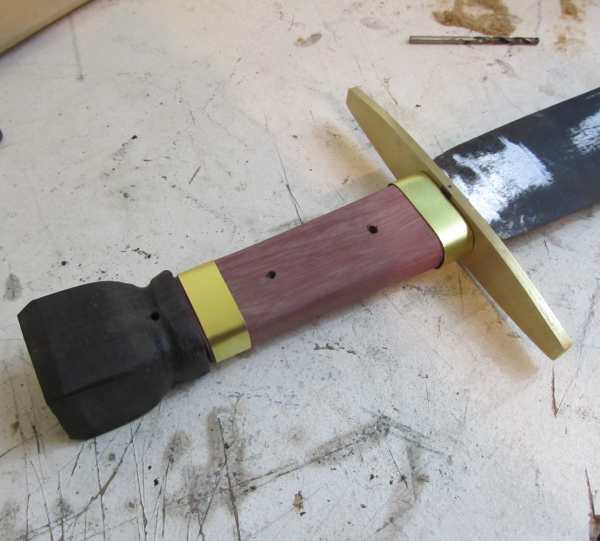
Here is one of the handle variations. This is a wooden handle and the wood is purpleheart. The pommel is also wood and I may change this. I am considering making one out of brass.
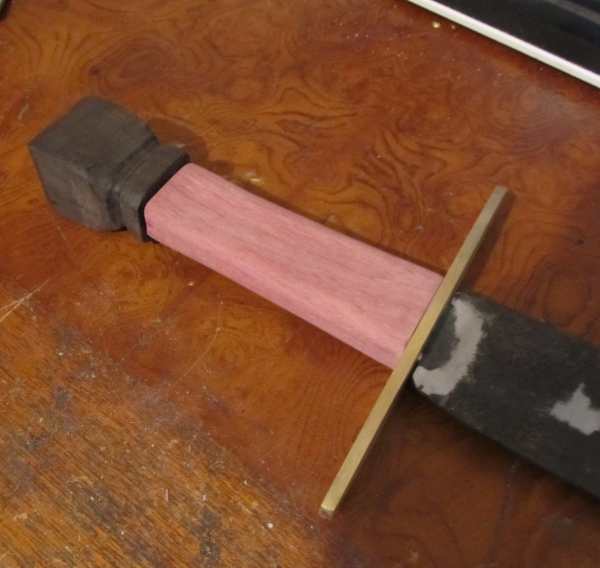
Let’s take a look at the main parts of a sword handle. There are three, the Pommel, the Grip, and the Guard.
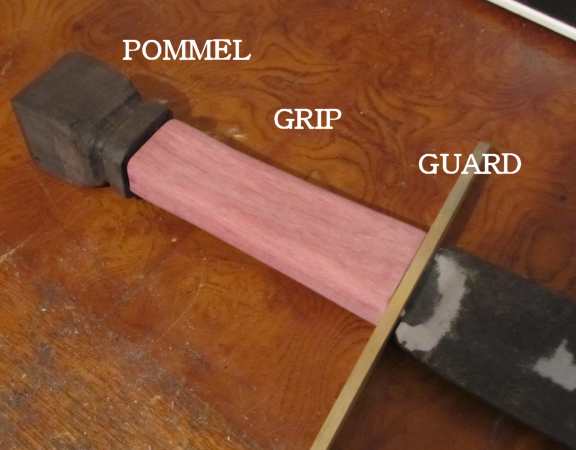
In the picture above The pommel is made of Ebony wood, the grip is made of Purpleheart and the guard is made of Brass. The brass guard is pretty standard. Brass is often used as the guard. The wooden pommel is a bit atypical because it doesn’t weigh much. More often a metal is used for the pommel. It helps to balance the weight of the sword.
How to Make the Guard
I use a piece of brass that is six inches long, One inch wide and 3/16 inch thick. This is called bar stock and it is easy to get. Here is the exact piece that I ordered on amazon.com: Brass Bar Stock

Before I started working the brass I made a template out of foam board. This way I can get the exact size and shape that I am looking for. You can use foamboard, cardboard or anything similar. It is very easy to tinker with it and change it this way.
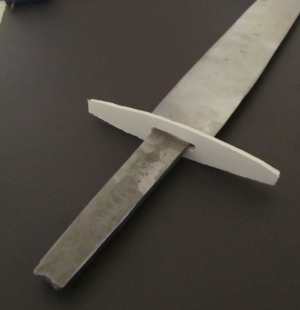
Here the template is placed on the sword. It looks pretty good. That is the shape and size I am going with. The slot is a little big so I will make sure to correct that in the brass version.

Now we have to make that pattern out of the brass bar. I shaped the whole thing on the belt sander. Brass is easy to work so you can use a variety of tools on it.
To get the slot I first drilled three holes then worked them with files.
As you are creating the guard you can fit it to the sword along the way to make sure it is moving in the right direction.
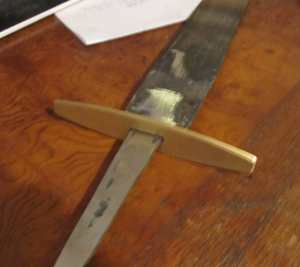
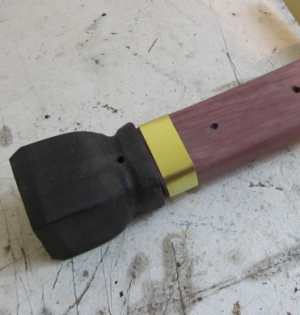
Here I have fit the guard to the sword. It looks great. One very important this is to be sure the guard is flat and square against the base fo the blade. It has to fit nice and flat. You can file at the guard or grind the base of the blade to achieve this.
Quick Tips
The guard is an individual thing and is custom fit and sized to the size and shape of the sword. Mine is just about six inches in length. Your will be different. Make it so it looks good. And the piece of brass that I bought was twelve inches long. This afforded me another six inches if I ruined this first one or wanted a different shape.
Brass is very easy to work with. It grinds and files very nicely so you will have no problem with this part. And it grabs steel very well and holds it which makes it effective in real sword play.
When cutting out the slot you should make it smaller than you need and check to see if it fits the sword, then file away some more. Continue to do this until you get a nice fit.
Make the wooden grip
In this part of the tutorial I show you how to make the wooden grip. And there are a lot of different kinds of handles you can make. I show you a plain wood handle and a wire wrapped handle. From here you can improvise all kinds of different handles to make anything that you like.
Here is one of the handle variations. This is a wooden handle and the wood is purpleheart. I started out with a raw piece of wood and I cut it with a hand saw until it was roughly the right size and shape then I worked it on the belt sander to bring it to its final shape. This grip is 4 1/2 inches in length. As you are making the grip you should be wrapping your hand on it to check for the feel of it. It is meant to be held in your hand so you have to insure a good feel and size.
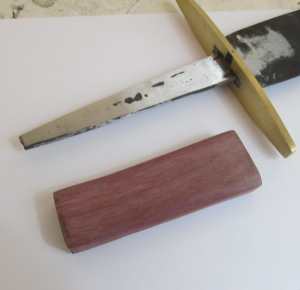
Wood selection: There are a whole lot of different woods you can use. You could use almost any wood but lean toward using a hardwood that doesn’t easily crack or split. This one is Purpleheart. I also made one out of zebrawood.
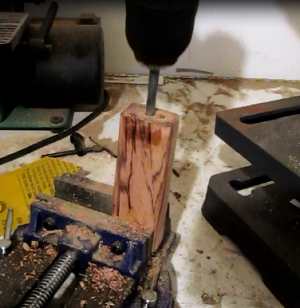
Next you have to drill out the handle so it fits on the tang snugly. You have to take your time with this. I put it in a vise and drilled three holes side by side. The drill bit isn’t long enough to go all the way through so I flipped the handle over and drilled three holes on the other end too. This way the slot goes all the way through.
I can’t give you exact dimensions on this because the tang of your sword will be different than mine. I did measure the thickness of the tang and use a drill the same size. And you want that slot in the grip to be wider on one end than the other because that’s the shape of the tang.
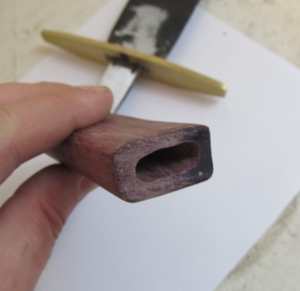
As you are working it be sure to constantly check it on the sword. It should fit snugly yet go all the way to the guard. And there should be a fair amount of room on the end so you can pin the pommel on.
Later in the process we will drill holes through the handle and through the tang of the sword. They will be pinned with brass rod. And this wood handle can be polished with an oil. Tung oil works very well for this.
![]()
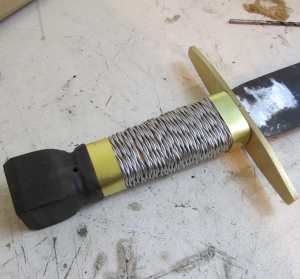
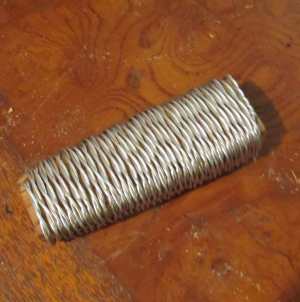
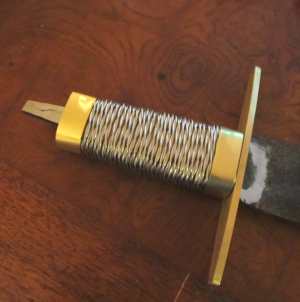
We can also do a wire wrapped handle for this sword. To do this you use a 16 gauge annealed wire. I used aluminum wire. You need a surprising amount of wire. To do this handle took about 30 feet of wire. You take two 15 foot lengths and you twist them by putting one end of each in a drill and slowly twisting. Clamp the far end of those wires in a vise.
We will wrap that twisted wire pair around the grip. To secure it in place you drill a small hole as shown in the picture. You insert the end of the wires in there and then wrap the whole handle. You drill another hole at the other end to insert the end of the wires after the wrapping is complete.
Next you wrap that twisted wire around the handle. Make it nice and tight.
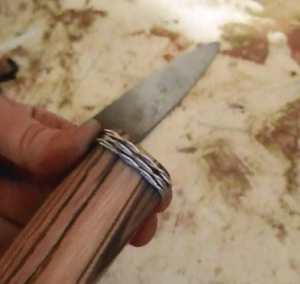
I also made some brass wraps for this handle. (They look good on the plain wood handle too) These are pretty easy to make.
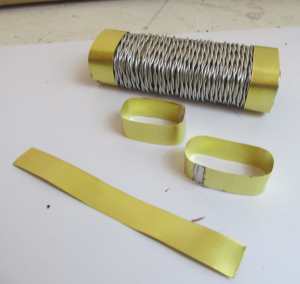
To make the wraps I used a sheet of brass .032 inches thick and cut out two strips with a pair of scissors. Wrap one around the spot on the handle then solder it together to form the loop. The strips are about 1/2 inch wide.
The picture here gives you a good look at the brass work. It shows a strip, the soldered bands and them in place on the handle.
Make the Pommel
In this part of the tutorial I show you how to make the pommel of the sword. Currently in this tutorial I make the pommel out of wood. You can use this same process to make one out of a type of metal. Brass works good. I will probably also do this and add it to this tutorial. For now we will look at the wooden pommel.
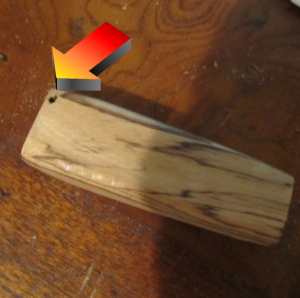
The picture below shows the wooden pommel that I made for this sword. In part the pommel is decorative. But it does serve some functions too. It keeps the handle on, it counterbalances the weight of the sword and it is used as a pummeling weapon. Keep these things in mind when making the pommel.
Wood selection: There are a whole lot of different woods you can use. You could use almost any wood but lean toward using a hardwood that doesn’t easily crack or split. This one is Purpleheart. I also made one out of zebrawood.
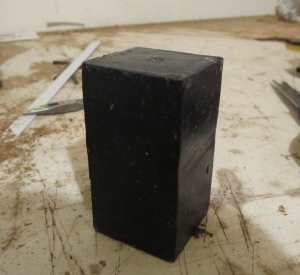
I used a piece of ebony wood. I used a variety of tools to shape it including files, rasps and the belt sander.
You also have to drill some holes part way into it to form the slot for the end of the tang. If you use wood for this be sure to choose a quality hardwood that won’t crack or split.
Once the pommel is done and it fits well you have to drill it. Put the pommel on the sword and drill right through it and the tang of the sword. This way you can pin it. I drilled a 1/8 inch hole so I can pin it with a 1/8 inch brass rod.
At this point in the process we do not pin anything in place. We have yet to harden and temper the blade in the forge. And do the final grinding and polishing.